New Carbon (CF) X-axis tube is available
- Ben Levi
- Jan 23, 2022
- 4 min read

Updated: Feb 11, 2022
My dear friends, Wonderful news!
Mellow just updated me that the first BLV Carbon X-axis tube batch is ready and finally available for us. All are made according to the ISO manufacturing sheets and data.
Update: It's all sold out!

For those who are not familiar with CF - Carbon Fiber is a very strong material, extremely lightweight, and with low thermal expansion. When permeated with a resin and baked, it forms CF (carbon fibers) reinforced polymer. This composite is extremely rigid and has a very high strength-to-weight ratio. Carbon fiber is very popular in civil engineering, military, sports cars, and aerospace. Actually, at my work (Autonomous Drones Dev-Lab) I use CNC machined carbon parts on a daily basis.
So, you must be asking yourself why using it in your 3D printer, right?
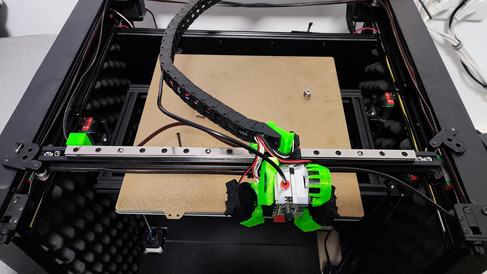
Well, A carbon fiber (CF) tube is significantly lighter than aluminum extrusion. The classic BLV x-axis aluminum extrusion weighs 213g while the new BLV X-Carbon tube weighs only 65g, That's amazing! The low weight reduces some of the load from the motion system, which helps to achieve better performance.


since I started using Klipper I noticed I can squeeze a lot more juice from the BLV mgn Cube 3d printer and print way faster than before. knowing the metal kit + BLV frame can handle much more than that - I upgraded the steppers to LDO 2sth48-2504ac (2.5A!), installed Spider v2.2 bard + HV5160 drivers running 48V. with this Setup, I print now extremely fast. But It wasn't enough for me, I knew that reducing weight from X will allow me to print even faster. Mellow surprised me and told me that he started to work with CF parts, this was my queue and I asked him to make the first BLV x-axis CF prototype.
I offered Mellow a much simpler and cheaper solution instead of using Rivet nuts - which loosens over time. under each screw, there is an access hole for a socket screwdriver - Simple and effective. this method made the CF tube very cheap. the price dropped by 65% and now the CF tube is affordable + free shipping.


Unlike the first prototype version I tested, I changed and improved a few things. you know the world isn't perfect and sometimes the installation is not 100% like it was designed on CAD plans. Therefore, I added oval screw holes only on one side of the tube, it will make the installation process much easier and you could adjust the tube position. I also added a hole that centers the tube if you are using the BLV metal Kit.


By the way, the New BLV Carbon X-axis tube is suitable for BLV Metal Kit. but If you still haven't upgraded to the Metal Kit I modified the printed Y brackets in order to make it suitable for the new BLV carbon X-axis tube too. the files are available here to download (STL+ CAD Step files)
Where I can Get my BLV CF X-Axis?
many of you are familiar with the Mellow store from Aliexpress and know that quality is very important to him. Although his products are not cheap, by making the CF tube manufacturing process cheaper, he was able to offer the CF tubes for the BLV project very cheap + free shipping. I'm so glad since I'm trying my best to keep every single part of the BLV project affordable to all. Click here to get your new BLV carbon (CF) X-Axis tube
Installation
The installation process is very easy, but you must first prepare the following items:
8pcs x M3 flanged Nylock nuts
4pcs x M5 T-nuts
1pc x M3 nut Socket Driver
First, download and print the BLV carbon adapters, you must print the file twice - one for each side of the CF tube. Make sure to use at least 6 walls and 90% infill. I uploaded for you both STL and CAD step files and it's available here for download:
After printing the adapters, take 4pcs of M5 t-nuts and turn them over. Insert 2 of them into the top and 2 into the bottom of the printed adapter. please make sure they will be inserted when they are upside down just like in the picture below.


Now, gently insert the adapter into place inside the carbon tube. Note the marking on the adapter. The "TOP" mark indicates that this side should be face up and the "IN" indicates that this side should be inside the carbon tube. Do the same for the other side too.


Once you have completed the first steps, please place a towel on the heated bed, to prevent any damage to the heated bed or print head. Please use duct tape on both sides of the carriage, to prevent the rider from moving left and right.
Release the upper metal parts located on the top of the old X-axis aluminum extrusion.
unscrew both M5 screws and only one of the screws as shown in the picture below:


Unscrew the rail M3x8mm screws, lift the X-axis, and carefully separate the rail from the aluminum extrusion. while doing make sure that the X-carriage is secure and can't slide out of the rail. Then, remove all M3 screws on the rail.
Slide the new Carbon X-axis tube into its place and start locking the bottom part using 2pcs of M5x12mm screws. do the same on both sides. Once finished, put back the upper metal parts and lock the M5x12mm screws in place. Also, put back carefully the idler and tighten the screw that holds it in place.
Please Note: If for some reason, the CF tube doesn't fit exactly, loosen one of the Y carriages or Y rail screws to make small adjustments. You can sand a bit the center hole and make it bigger for maximum fit.
re-Install the X-rail in place exactly as shown in the following animation:

It is very important to lock the nuts well and make sure that the Y-axis moves smoothly.
If your BLV printer running Klipper and you are using acceleration Resonance Compensation - it must be re-calibrated.
I hope you would like it :)
Sincerely
Ben Levi - BLV project dev.


Commentaires